Monday 30 January 2012

Basing Tutorial

Greetings one and all! Hope the new year's treating you well so far.
Been rather busy working lately, so haven't made any progress on the rest of my Warrior-regiment, but I found some pictures I took while painting the base of my standard bearer - recalling that I had planned to write a brief tutorial on how I do my bases lately. So without further ado, her goes:

First of all, I tend to use a bit of barch and some milliput to build up my bases, creating rocks and elevation. Add a pinch of sand, make sure the miniature fits onto the mix ( I usually drill a hole for the mini's foot-pin(s)), undercoat and then we're ready to start painting.

1. I start off with a nice coat of Shadow Grey. The blue-tinged grey works quite well for shadows and areas of shade - in fact I use this colour quite extensively when shading my miniatures as well, and find that by using many of the same colours on both base and miniature, it all gets tied better together and looks more natural - as if it's the same sun illuminating both the warrior and its environment.

2. My second shading colour of choice is Scorched Brown. I mix it with water and give the base a good ol' wash. Then I use Skull White to bring out edges and details; sand gets drybrushed, while edges are roughly highlighted.

3. Like I did with Scorched Brown, I make a wash out of watered down Chaos Black. I'm sure some of you might argue that I could just as well have used GW's washes, but this way I can more easily control the colour and opacity of my layers, and I don't risk getting these shiny bits from too much wash...

4: Now, this is the funny bit. Basically I just pick a set of striking colours (Blood Red, Darkangels Green, Ice Blue, Golden Yellow), water 'em down a bit, and place spots randomly on the rocky-bits of the base. It looks rather unnatural at this stage, but when the final layers gets on, these strange spots shine through and to my eyes it mimics the diversity of natural rocks quite well.

5: Watered down mix of Shadow Grey, Chaos Black and Skull White dampens the colourful spots, bringing back the greyness to the base.

6: Finally fine edge highlighting with Skull White for the rocks - maybe a bit of drybrushing over the sand, if you want to bring it out more.

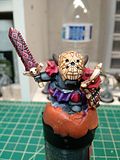
The miniature is then glued/pinned on, I place small droplets of super glue where I want static grass (I use GW's Dead Grass, then place a smaller droplet of glue on top of that after it is dry, and glue some Burnt Grass on top of the previously placed grass - I guess one could just mix the two types and do it in one go, but I havn't tried that); if I want longer blades of grass, I use hair. The leaves on my bases are made by grinding a dried leaf into smaller bits.
Hope you've enjoyed this brief tutorial, and if nothing else it can serve as some inspiration.

Saturday 31 December 2011

Happy New Year

Hey everyone, just thought I'd pop in and wish you all a happy new year.

My standard bearer didn't quite cut it at December month's Knights of the Brush competition - no wonder, as Santa himself decided to join in on the fun:


Great conversion and paint job by Mikkel, hope you like it as well!

Wednesday 21 December 2011

Standard Bearer - Finished

Arrived safely in Norway this evening, but managed to shoot a couple of pictures of my take on the Chaos Exalted Hero, before dropping him off at Games Workshop and catching my plane.

After talking to some friends, I decided to go for a traditional banner instead of a flag, and added onto the plastic banner from the Chaos Marauder Horsemen set. Got a couple of spare parts from the old mounted Champion of Slaanesh and the Dark Elf Cold One Knight boxes. I didn't have time to paint any freehand on the banner, but after I return to Denmark I'll see it through.

I've used a rather limited palette on this piece: only Skull White, Chaos Black, Shadow Grey, Mithril Silver and Scorched Brown (except on the base, which got a few colours more - but I'll make a short tutorial of it later), which I think has worked quite well to tie the whole model together. Granted, not the typical colours of Slaanesh, but I really like the concept of using light and clean colours to represent darkness or evil. And while I have nothing against pink personally, I do find it slightly over-used, so I wanted to try something else to make it stand out more.

With all the armour on this model, I've had ample opportunities to practice shading of metal - or painting true metallic metal, if you like - and I really like the process and results. To top it off, it goes faster and faster for every part, and I hope to keep this level up on the rest of the unit. I have mentioned in an earlier post, I believe, that this miniature will be part of a regiment of Chaos Warriors with the Mark of Slaanesh, and when I get back to Denmark I hope to be able to complete the first rank sometime february. There is some rather extensive converting and sculpting involved, and I have to figure out how to make a couple of things in sculpting putty as I go, but having one model finished surely helps on the motivation!

But now time for some pictures: Hope you like him! As always, comments and criticism is welcome!
The voting for december's Knights of the Brush will take place tuesday the 27th, so if you live in or near Copenhagen, feel free to drop by GW's store there, as I'm sure there will be several really great entries this month as well!

Late night update

So it's 2:30 am here, and I've just put brushes, paint and glue down, and decided that the standard bearer is as good as he gets, if I'm to pack my clothes and christmas gifts as well as catch a couple of hours of sleep tonight.

I never got 'round to painting any freehand on the banner, but I'll get it done when I'm back in Denmark come january. I'll get some pictures of him up in the coming days, as well as a quick tutorial on how I make and paint the bases for my miniatures.

Now I'll have to track down my suitcase and get 'round to packing; watch this spot!

Monday 19 December 2011

Standard bearer WIP

Just a little WIP shot of the standard bearer.
For fun I thought I'd try something new with his helmet - the freehand need some cleaning, but I think I'll leave that for later - so much left to do! And I've got only tonight and tomorrow to finish him, if I want to participate in december's Knights of the Brush, as there's a plane waiting for me wednesday to take me back to my parents' place in Norway.

Don't know what you think? Part of me likes the freehand on the helmet, but on the other hand the lovely shape of the Chaos Warrior helmet gets a bit lost?

Saturday 3 December 2011

Hoist That Rag!

So, it turned out that my finecast model wasn't of as good quality as I first presumed, and I've spent the last couple of days filling bubble-holes and trying to correct a huge molding fault. It's as if the two parts of the mold hasn't been correctly fitted, so the rear part of the model is roughly 0.5 lower than the front. So his left arm and leg has recieved quite the bit of sculpting, to correct this. Luckily, the rest of the mold line is hidden by the fur of his cloak, or ran down a undetailed area on his right side, and was thus fairly easy to remove with my hobbyknife. Still frustrating.

Either way, I've decided to make him the standard bearer of my regiment, and have started converting a bit: I've replaced the original head with a regular Chaos Warrior helmet sans horns, replaced the axehead of his left-hand weapon with an axe from the Chaos Knight sprue, and filled most of the holes in his cloak. As the unit will bear the Mark of Slaanesh, I want to reduce the worn look typical to the Chaos Warrior regiments' cloaks and equipment, and make them look a bit more like they care how they look. Sure, they've been out raiding and seen many a battle, but they won't be seen dressed in rotting cloth and rusty armour!

So here's how he's standing at the moment - not pinned or glued to his base yet, I prefer to paint them separately.
As his right arm also suffered from the faulty moldline, and in addition had two bubbles ruining the chainmail, I thought I'd sculpt the whole arm from scratch, and I hope to finish it by the weekend, so I can start painting next week. Speaking of sculpting, I've giving brownstuff a go at this model, and I'm very happy with how this putty's working. It cures harder than regular greenstuff, making it easier to cut and file should one want to do that, but it also stays more in shape than greenstuff: making it easier to get those sharp and defined edges you want when sculpting armour. Greenstuff, by contrast, acts in a slightly more "liquid" way: if you don't return and work on a spot regularily until it cures, the putty tends to go soft and gives rounded edges - which can work out very well if you're trying to sculpt something organic or soft, like flesh or cloth. So both putties has their uses, and I'm still very much at a learning stage, but hopefully this project will get me a few more steps along the way.

The standard itself will also be scratchbuilt from a 2mm iron pole and some putty, and I made my first attempt yesterday:
I got some nice tips from Mati over at Massive Voodoo on how to sculpt cloaks and the like, and used the techniques he suggested when I made the flag (as you can see from my setup below, I opted for paintpots instead of wire, as the flag was so large).
The technique seems to be working fine, but I'll have to remake the whole thing and make some minor adjustments before it gets where I want it, I think. For one thing, I managed to make it way out of proportions, it's too large! Secondly, a combination of too thin layer of putty and the wrong ratio of putty-parts made the flag slightly softer than I'd like. But I'll give it a new go and hopefully improve the outcome.

I have been debating with myself whether a flag or regular banner will look best on the tabletop; any thoughts from you guys?

Monday 28 November 2011

Here they come!

After tallying the votes saturday, it turns out I once more have the honour of picking the miniature for GW Copenhagen's monthly Knights of the Brush painting competition - and hence forth we are allowed to do a bit of converting, which suits me just fine. I'm sticking to the army of my heart, Warriors of Chaos, having chosen the Chaos Exalted Hero - and I do hope this doesn't bother too many; I was slightly dissapointed to see only three entries, including my own, last saturday. Anyways, fingers crossed that more will join in on the fun this month!

I picked up the last box in the store, and while the curse of finecast-bubbles still seem to linger, it doesn't bother me that much, as I'll play around with some greenstuff either way. Without revealing too much at this point (my initial plans for any model are always prone to change as the project progresses..), I have planned to make him fit into a Chaos Warrior regiment, which has been collecting dust in an unfinished state since the early months of 2010. The concept of this regiment was, well first of all, it will have the Mark of Slaanesh, but that's not so groundbreaking. But what I really wanted to do with this unit, was to break up the very rigid and boring poses the otherwise greatly sculpted Chaos Warriors suffer from, and to make it look as if the whole group was charging headlong towards the enemy. And it went fairly well with the first miniature, until I started to resculpt the cloak. I couldn't get the putty thin enough, or it didn't look natural, and attempts to use paperclips or plasticard didn't get me anywhere. So I lost motivation and shelved the project - until now!

I'll use the Exhalted Hero as part of the regiment; granted, he does not run, but the pose is rather nice and unique, so it will break up the rather monotonous look of most Chaos Warrior regiments. Furthermore, after I am done converting him, he'll serve as a nice model to test the paint scheme and has given me much needed motivation to dust off the box of unfinished Warriors and other bits and pieces I thought I could use for the project. I got to spend a couple of hours among plastic, glue and greenstuff, and this is a snapshot of my workspace and the state of my regiment.
I've still not figured out how I'm to make the cloaks (any tips or links to good tutorials would be greatly appreciated!), but I did experiment a bit with a grey putty, called ProCreate the other day. I was unable to make a cloak out of it, but it felt really nice to work with, so I'll probably give it a shot. Also have a batch of brownstuff lying about somewhere, which I have yet to test, but I have heard it's best suited for armour plates and other bits with sharp and defined edges.

Either way, will be nice to work on a regiment again; single characters are all very nice, and I do love the Knights of the Brush concept, as it not only lets me paint wonderfully sculpted miniatures, which I probably wouldn't buy normally (e.g. the Wood Elf Highborn), but also the deadline ensures that I finish them! But to complete a new regiment, that's something I honestly haven't done in a long time, but it also looks so much grander, doesn't it?
Strength in numbers!

Friday 25 November 2011

Chaos Sorcerer Lord

So slooooow!
I think I have to enter some regular "painting time" into my weekly schedule, 'cos a single model painted in a month, that's hardly progress at all. Won't get my army finished this century, that's for sure!

Either way, the Sorcerer Lord for tomorrow's Knights of the Brush painting competition is finished, and I do hope you like him! Very happy with how he turned out myself, although I caught a glimpse of another contestant's mini at the store today, and he's also gone for the magma-armour, which I had hoped would score me some easy "uniqueness points"...
C&C welcome.

Sunday 13 November 2011

Chaos Sorcerer Lord - WIP

Progress has been slow this past week, or rather nonexistent.. But this morning/afternoon I managed to get some painting done - it's not much, but at least it's a start.
It's my first try on magma-armour, heavily inspired by Vincent Hudon's Magmatrax and redmanphill's Warriors of Slaanesh, and I think it fits a magican attuned to the Lore of Fire quite well.

I did the plates on his back first, and might redo them, as I personally find the smaller grid on the frontal plates more to my preferances. The remaining armour will be painted as dark steel, although I haven't decided on whether I'll try some lighting-effects from the magma (or if that will be too much?), or simply giving it a ever so slightly bronze-tint. Any suggestions?

Thursday 3 November 2011

To the Top!

Just thought I'd drop by with a quick update, as I just was notified that my Amethyst Wizard won october month's Knights of the Brush competition!

This means that I get to choose the miniature we'll be painting this month, and I've choosen this chap:
The (relativly) new plastic Chaos Sorcerer Lord.
As you can see, I've started on a dark-red colour scheme, which in the end will mark him off as a sorcerer devoted to the Lore of Fire.